Wednesday, December 30, 2015

Use Google Drawing to Make a Meme

If you click the link to the Google Drawing Meme Template, you'll notice the example is setup as 700pxX700px which is a standard size for a square meme. These are the directions for using the template to create your own meme. The idea that I'm thinking about is to do this with teachers or students in January centered around creating a goals or reflections based meme for 2016.
Directions:
  1. Make a copy of the Drawing so you can edit it.
  2. Click on the middle of the image to select it and delete it.
  3. Insert your own image by clicking: Insert > Image and choose an image to upload or choose one from the internet.
  4. Move the picture to the back
    1. Select the picture, and right click.
    2. Choose Order > Send to back
  5. Re-size your image to fill the drawing canvas so there are no blank edges by grabbing the corners and re-sizing it.
    1. Make sure you don’t change the “aspect ratio” which means you don’t stretch it wider than you do tall.
    2. If you have to make it bigger than the canvas, that’s ok, we’ll crop in the next step.
  6. Crop your image
    1. Once it takes up the whole canvas, click on the crop tool and use the black handles to crop the picture to fit the canvas.  You should be able to see the canvas edges faintly behind the picture.
  7. Re-position your picture if needed.
    1. If necessary, re-position your picture on the canvas by:
      1. De-select it then hover over the picture to get the 4-sided arrow and move the picture around so that it is centered.
      2. You may need to select the picture and the crop tool to re-size it.
  8. Create your Meme Text
    1. Double click the Word Art text box at the top of the meme and type your text.  The example text fits the canvas. Use it as a guide.
      1. Make sure caps lock is on.
      2. Use Shift Enter for a new line.
      3. Use Enter to save.
      4. Repeat for the text at the bottom of the canvas.
  9. Share - Personal & Together
    1. Click File > Download as > .jpg.
      1. This should download the picture to your desktop or your downloads folder.
      2. Click on the arrow and select Show in folder to see where the file is located.
      3. Minimize that window. (Don’t close it.)
  10. Personal - Decide where you'd like to post your meme. Think about somewhere that you'll see often. For example, you could save it and set it as your school desktop background picture or your school computer screen saver.  
  11. Together - For our project - Click the link in our Google Classroom and add your meme to the Slide show.

Make Your Meme - 2016

Brian Sztabnik https://t.co/7unHh66ERC
www.Bestlessonseries.com by Brian Sztabnik
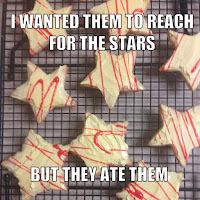
This morning, while browsing Twitter and trying to figure out #Edcampvoxer (last minute Lucy, I know!), I ran across this picture by Brian Sztabnik It falls into the category of inspirational and touching. And, I love the idea of stating what you want for your students and crystallizing it into a meme.  What a powerful process to go through.
(Follow Brian on Twitter: https://twitter.com/TalksWTeachers)

Memes are known best as those clever, sarcastic, funny, sometimes touching internet pictures that circulate around social media.  I love them. They make me laugh, inspire me or provide a springboard for a presentation.  

At the same time over Christmas break, I'm noticing that all my favorite Twitter chats are getting geared up for 2016 with some kind of goals setting oriented chat topics.


Light Bulb Moment
https://en.wikipedia.org/wiki/Phase-out_of_incandescent_light_bulbs
Light Bulb Moment
Why not do this for myself? Well, duh....  But, like I said, last minute Lucy....

Tips for creating memes for your 2016 goals...

1. Figure out what you want to say first.
I browsed meme generator sites to see what was out there and experimented with creating a couple memes, but I found the hardest part was deciding what text to type on my selected picture.  I discovered that my process required that I figure out my meme text first and go in search of a picture second.

2. On-Line Meme generators.
I Googled meme generators and found tons of options. From what I can tell, the benefit of using an online site is the built in formatting.  Memegenerator for example didn't require me to download anything and it has a diverse (but limited) library of meme images. Everything from Sad Keanu and Grumpy Cat to Star Wars and The Sound of Music.  Memeful allowed me to easily upload my own image and share it to Twitter or Facebook, but I decided to do a quick screenshot to save it to my pictures.  Imgflip allowed me to upload my own picture without creating an account and to easily download it to my computer.  Imgur gave me options to download, embed and link without creating an account too.  Makeameme didn't show me my meme when I clicked "private". It looks like I need to create an account, which I'm not interested in doing.  So, I kept looking to see if I could find one that saves directly to Google Drive.  ImageChef - no Google Drive. Quickmeme - wanted me to login with Facebook, so nope. 

Scroll, scroll, scroll.... hmmm.... Another thought occurs to me. We're all teachers, right? We might want to use this idea with students. It would be powerful to have students create a meme to express the theme or setting, what a character might say.... In science and math... But, none of the sites listed above is appropriate for students. Even without making an account, these sites have too much mature content.  What's a teacher to do?  

Make it in Google of course.  I experimented with Google Slides first, but it turns out the Impact font is T.H.E. meme font and it is really hard to duplicate in Google Slides. If you figure it out, let me know!  But, Google Drawing works really well. It has the Impact font and it has Word Art so you can add the classic meme black outline. 

Here's a link to a template with directions that you can use if you'd like to try it.

Monday, December 21, 2015

Teaching the Same Old Thing in a Whole New Way

Tonight's #flipclass flashblog is about teaching the same old thing in a whole new way. I have a lot of activities that I L.O.V.E. to do. That kids love to do and that seem to hit the standards very well. But, I've never been able to repeat the same things over and over every year. Even the best activities are boring!  Cell division is a good example.  It has been part of middle school science in one way or another for the 14 years that I've been teaching and the details don't really change.  Mitosis is mitosis.  Every year, I try to change things to keep it fresh for both me and the students.  Most years students create a mnemonic device to remember the steps of mitosis. One year we did the yarn activity. Another year we used Twizzlers. We've looked at onion root tips under the microscope. We've watched really cool and amazing videos of cells dividing. 14 years is a lot of mitosis activities. One year, I remember watching a video from Cells Alive and thinking it's like a dance.  There it was. Let's see if we can create a dance for cell division.  I provided the students with some supplies:

  • Different colored T-shirts to color code themselves as sister chromatids.
  • Segments of rope in different colors to represent different membranes.
  • Carabeeners and long ropes to represent spindle fibers and centromeres.
  • Various signs
Students divided into groups based on their roles and created their movements. We commandeered the school lobby so we'd have space to practice. And, we had a ton of fun.